
Unika Multi-Surface Worktop Jig
About
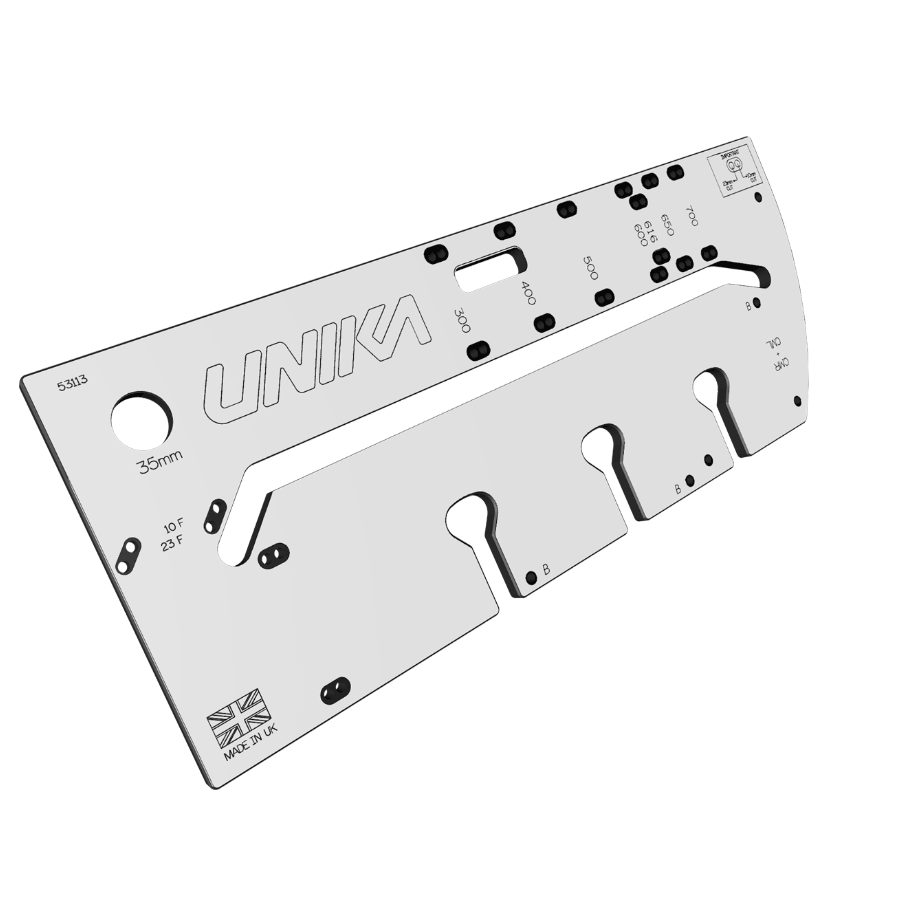
Manufactured by Europe’s leading Worktop Jig Company, the Multi-Surface Worktop Jig cuts Composite, Laminate and Solid Wood Worktops
- Cuts 10mm inset for – Composite, Solid Wood and Square Edge worktops up to 10mm. 10mm cut requires less router work and produces a neater joint.
- Cuts 23mm inset for – Standard Laminate Worktops with a radius edge of more than 10mm.
Cuts:
300mm, 400mm, 500mm, 600mm, 616mm, 620mm, 650mm & 700mm Worktops.
Use with a 12.7mm Router Cutter & 30mm Guide Bush. Supplied with 6 nylon aligning pegs & full user instructions
- Multi-Surface jig is the first of its kind on the market and is suitable for use with a variety of worktop materials
- 12mm Hardwearing Compact Laminate
- Guaranteed never to warp
Additional information
Jigs are used in quality installation of kitchen, bedroom and bathroom furniture. This jig is manufactured from a composite material to the highest tolerance on CNC machinery to ensure a perfect finish. This material will withstand water, solvents, adhesives and cleaning agents often used in the installation of kitchens. Before starting please take some time to read through these instructions carefully. The jig has been designed to be as easy as possible to use, however we recommend that, if you are inexperienced, you practise on off-cuts prior to the first installation.
This jig has been designed to give a 10mm or a 23mm inset when joining worktops. The 10mm inset gives a better finish when using small radius edged worktops (<6mm) in conventional laminate, composite material or solid timber. The 23mm inset is used when joining worktops with a classic postformed edge. The jig can be used to fit 90° and 45° corners for worktops of widths 300, 400, 500, 600, 616, 650 and 700 mm. By using shims other worktop widths can be accommodated.
SAFETY FIRST
- Make sure all cables are clear of the router.
- Make sure the work piece is correctly supported.
- Always use protective goggles when using the router.
- Do not switch router on with blade touching the work.
- Never remove the router when it is switched on and moving.
- Make sure there are no obstructions to the path of the router.
DURING CUTTING
- Never try to cut more than 10mm depth on one cut.
- Do not force the router too fast. This can damage expensive router bits.
- Never remove the router from the jig whilst it is in motion. Always allow router to stop and switch off before removing.
- Ensure that the section of the worktop to be routed out is well supported from below.
- If routing for a long period of time, we advise that ear protection is worn.
POOR FINISH ON MALE/FEMALE JOINT FACES
This is probably caused by an incomplete routing process.
Ensure the final stroke against the far edge of the centre slot is performed.
SHARP ANGLE NEAR POST-FORM EDGE ON MALE/FEMALE
This is probably caused by an incomplete routing process.
Ensure the final stroke against the far edge of the centre slot is performed.
GOOD FINISH, BUT MALE AND FEMALE DON’T MATCH UP
This is probably caused by the incorrect size of cutter and/or guide bush being used.
Ensure a 12.7mm cutter and 30mm guide bush is used. Nothing else is suitable.
INCONSISTENT RESULTS – WANDERING EDGES
This is probably caused by a loose guide bush.
Ensure the guide bush is firmly attached to the router base.
IRREGULAR GAPS ON RH MALE AND/OR LH FEMALE FACE
This is probably caused by poor router control.
Ensure the cutter remains absolutely perpendicular on these cuts.
Where to buy

Use Discount Code WJC10
when you order through KFS to
receive a 10% Discount on this Jig
